
Do Timber Acoustic Panels Need an Air Gap or Backing to Work?
The question of whether to specify an acoustic panel air gap tends to arrive at an awkward moment. You've settled on a slatted timber finish, and suddenly you need to know how deep the wall build-up will be, what fixings the joiner needs, and whether there's budget for battens and insulation behind the panels. The honest answer is that timber acoustic panels will work without a cavity as long as they have a proper porous backing, but a gap almost always improves absorption and pushes useful performance further down the frequency range.
What follows sets out three mounting options, direct-fix, backed panels over battens, and a cavity with insulation, and explains which one suits the level and frequency range of absorption you're after. One thing to be clear on from the start: all of this is about controlling reverberation inside a room, not blocking sound between rooms. Those are different problems with different solutions.
The short answer: the panel works, but the system does the work
A slatted timber panel with an absorptive backing, fixed straight to the wall, will reduce echo. That's worth saying plainly, because the alternative advice, that panels are useless without a cavity, simply isn't true. What makes a slatted panel acoustic rather than decorative is that sound can pass between the slats and reach something soft behind them, so provided that layer is there and the open area is genuine, direct fixing gives you a real, measurable improvement.
The limitation is where that improvement sits. A shallow direct-fixed build-up does most of its work in the mid and higher frequencies, which is exactly where speech sibilance, clatter and sharp flutter echo live, so rooms really do sound calmer. Lower frequencies are a different matter, and that's where a cavity changes the outcome, because adding depth behind the absorptive layer increases the effective acoustic depth of the whole assembly and typically extends useful absorption lower in the frequency range than the same panel fixed flat. In testing elsewhere in the industry, a 30 mm panel with only a 50 mm gap behind it has performed much like an 80 mm panel through the 160 to 400 Hz range, which gives some sense of how much a modest cavity buys you.
So the gap isn't a requirement. It's a decision about how much performance you want relative to how much wall depth and budget you can give up.
Why an air gap improves lower-frequency absorption
Porous absorbers work by friction. Sound makes air move, that air travels through the fibres of felt, mineral wool or polyester, and the resistance turns some of the energy into a tiny amount of heat. No air movement, no absorption. That's the whole mechanism, and it explains everything that follows.
Air movement isn't uniform across a room, though. Right at the face of a rigid wall, particle velocity drops close to zero because the air has nowhere to go, so a thin absorber pressed flat against masonry sits in the least useful place for the longer wavelengths. That's why shallow material struggles at low frequencies while still handling high ones well. Spacing the absorber off the wall moves it into a zone where the air is actually moving, and the cavity behind it adds to the total effective depth of the system.
The practical rule is about wavelength. High frequencies are short and easy to catch with a thin layer of felt, whereas low frequencies are long, and a note around 250 Hz has a wavelength of roughly 1.4 metres, so catching that kind of energy needs depth. That depth can come from a thicker panel, a deeper cavity, insulation, or a combination of all three. The system doesn't much care where the depth comes from, only that it's there.
What the backing behind the slats is actually doing
The felt, polyester or mineral fibre behind a slatted panel isn't a colour choice, it's the absorber. The timber slats themselves are close to acoustically reflective; their job is the visible finish and some scattering of sound across the surface. Absorption happens in the open area between the slats, where sound passes through and meets the porous layer or the cavity beyond it.
This is why the backing specification matters far more than the timber species. A hard, sealed or non-porous board behind the slats, a painted MDF substrate for instance, gives you something that looks like an acoustic panel and behaves like a reflective feature wall: sound reaches the openings, finds a solid surface, and comes straight back into the room.
Backing thickness and density both affect performance, so specify against tested system data rather than assuming the timber face tells you anything about absorption. If a product quotes an absorption coefficient, check what was behind the panel when it was measured.
Three mounting build-ups, and what each one buys you
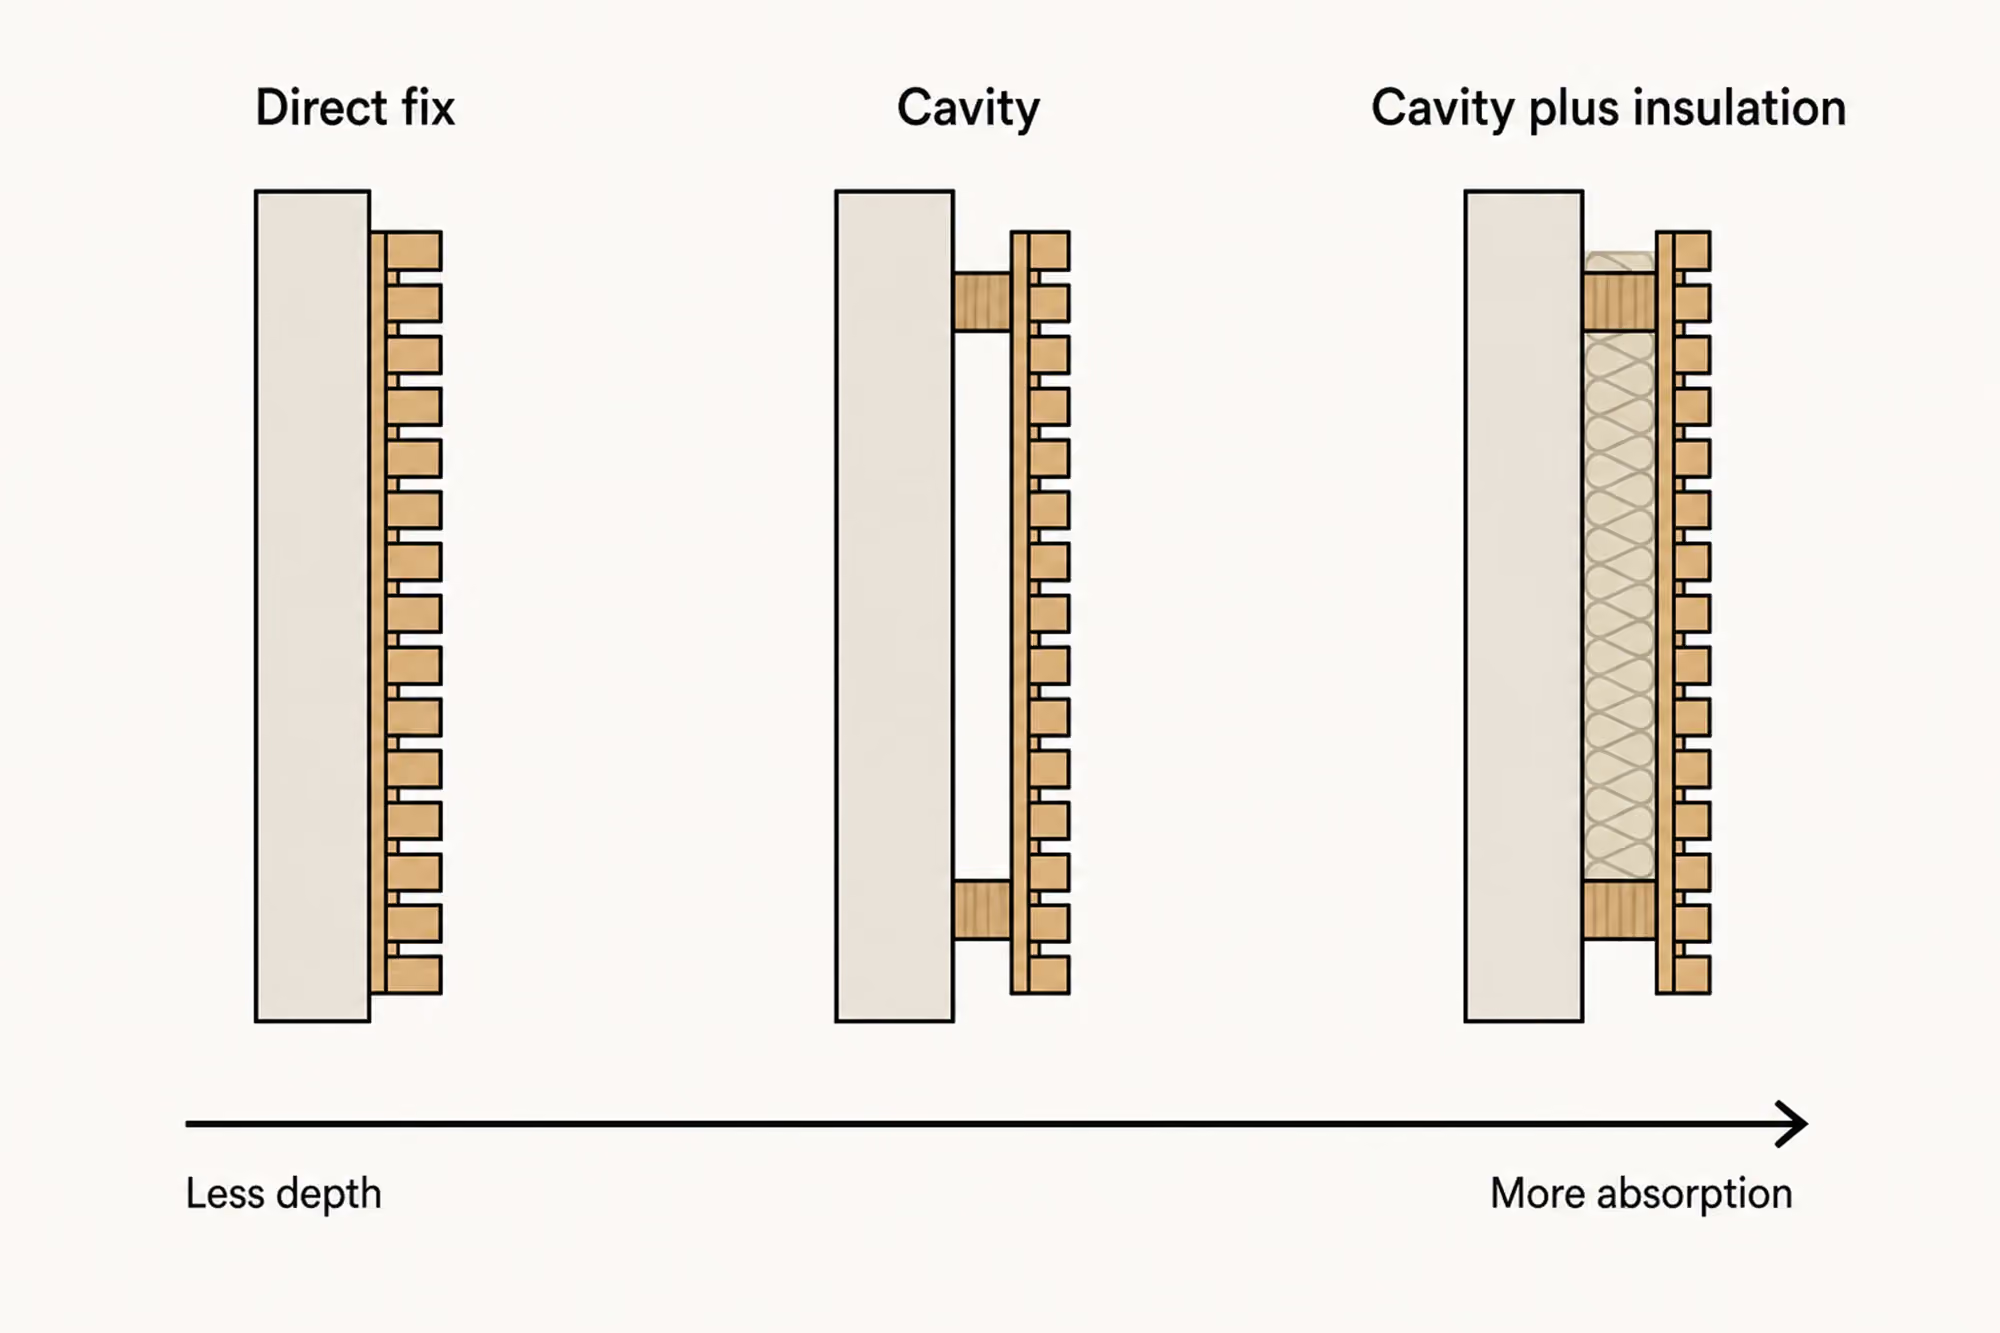
Direct to wall. The panel is fixed straight onto plasterboard or masonry, which gives the slimmest build-up and the simplest installation. Choose this where floor area is tight, where the panel run is relatively small, or where the brief is a feature wall with a useful side benefit rather than a genuine acoustic target. Expect solid control of higher-frequency reflections and modest results lower down.
Panel over battens or furring channels. A defined cavity behind the panel improves overall absorption and extends useful performance lower than direct fixing, for very little extra cost. Even 50 to 100 mm makes a difference, and deeper cavities in the range of roughly 100 to 150 mm keep pushing the benefit further down. The key detail is to specify the cavity depth on the drawings and confirm it on site, because it's easy for an installer to pack out or reduce the gap during levelling and quietly lose the benefit you paid for.
Cavity plus insulation. Filling the cavity with mineral fibre, polyester or similar porous insulation gives the strongest broad-band absorption of the three. Make sure the insulation is mechanically retained so it can't slump behind the panels over time, that it doesn't obstruct ventilation paths or services, and that it satisfies the project's fire and moisture requirements.
Depth isn't the only variable, though. The result comes from the whole assembly, the open area between slats, the backing, the cavity, the insulation and the substrate behind it, so a deep gap behind a poorly backed panel won't rescue the specification.
When the cavity is worth the extra depth and cost
Specify a cavity and a proper porous backing where the room is large, hard-surfaced or acoustically demanding: open-plan offices, restaurants and bars, lecture and teaching spaces, reception areas, home cinemas, studios and media rooms. These are the spaces where glass, concrete, tile and exposed soffits leave very little natural absorption, and where speech intelligibility is part of the brief rather than a nicety.
The cavity earns its place most clearly when the complaint isn't a sharp, obvious echo but a room that feels boomy, loud and tiring after an hour. That sensation usually comes from mid-to-low frequency energy building up, and it's precisely the range a shallow direct-fixed panel handles least well.
For a small run of panels behind a bed head, a quiet residential hallway or a feature wall where light reverberation control is all anyone expects, the extra depth is hard to justify. So a simple decision rule: direct-fix for minimum depth and a modest improvement; backed panels for reliable everyday echo control; and backed panels over an insulated cavity where acoustic performance is a core design requirement rather than a bonus. Anyone specifying architectural timber in Perth will find that comparing finishes, slat profiles and backing options against these principles makes it far easier to land on the right acoustic panel build for the space.
Specify the whole assembly, not just the panel
Before the specification goes out, confirm the details that actually determine performance: total system depth, slat spacing and open area, backing material and density, cavity depth, insulation type and density, fixing method, substrate, fire requirements and the tested absorption data for the assembly you're proposing.
That last point deserves emphasis, because absorption figures are properties of a tested build-up rather than of a panel in isolation. A product measured over a 50 mm cavity with insulation won't deliver the same numbers when it's glued flat to masonry, so match the published test condition to the installation you're drawing, or ask for data that reflects it.
It's also worth being firm with clients about scope. Timber acoustic panels reduce reflections within a room; they don't stop sound passing to the room next door. Isolation is a separate exercise involving mass, airtight sealing, decoupled linings and flanking control, and no amount of slatted timber substitutes for it.
If acoustic performance genuinely matters and the wall depth allows, the recommendation is straightforward: a porous-backed slatted timber panel mounted over a defined cavity, with suitable insulation in that cavity, for the broadest and most consistent absorption across the frequency range.